Tips On Removing Debris From a Black Background
April 5, 2016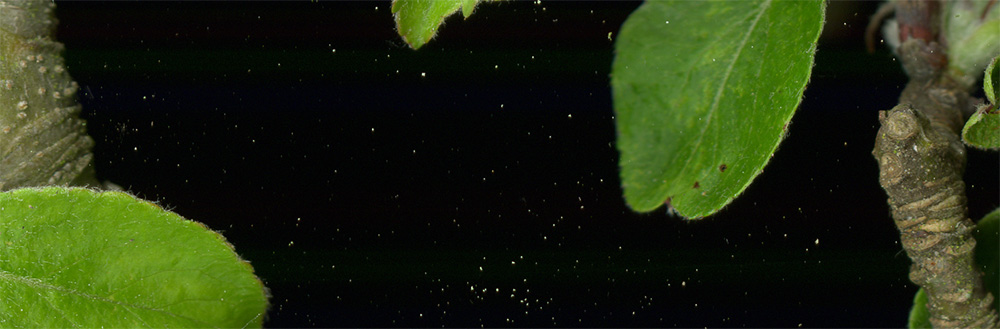
One of the major benefits of scanography is the immense amount of detail that the scanner is able to reproduce. Of course, as is often the case, this advantage comes with a downside — the unavoidable amount of dust, pollen and debris that ends up on your final image. While regular cleanings of the scanner glass can prevent this to an extent, the combination of the scanner’s electrostatic charge which attracts dust and the shedding of organic objects will always deposit undesired “leave behinds”. In Photoshop, cleaning the foreground has to be done manually, one speck at a time (techniques discussed in a future blog post). However, the black background can be done with some automation to help speed up the process.
To accomplish this, I use a “Masked Adjustment Layer”, which is one of the most powerful tools in Photoshop. I use the same concept on much of the work I do, so keep in mind this technique can be applied in many different ways. The goal of this tutorial is to isolate the background from the foreground with a selection. Our selection will include all of the background debris. Next, we will turn everything that is selected to a solid black. In our images, the background is mostly already a solid black, so the end result is that the lighter debris are effected most, turning to black, while the part that is already black becomes a darker, richer black.
Adjustments can control the color balance, contrast, saturation, and many other properties of your image. Their more advanced sibling, Adjustment Layers, has two advantages: being editable at any point before the file is flattened plus the ability to add a mask. Including a mask will confine your adjustments to very specific areas, targeting only those places you’d like to effect, and leaving the rest as is.
Make a rough selection with Color Range
Selections and masks are frequently easier to create if you’re able to start by quickly grabbing a rough selection and then refining it with other tools. How you achieve the initial selection will vary a lot from image to image. In our case, we are trying to select an area that is almost entirely black. This makes Color Range the optimal tool to help with this selection as it selects pixels based on a color sample you choose.

- With your image open, go to the menu bar and choose Select > Color Range
- When the Color Range dialog comes up (Fig A), it will automatically select the eye dropper tool. Click on the background of your scan, on a clear patch of black to set a sample point.
- The Color Range dialog will show you a preview of your selection. Everything that is white is selected, and everything that is black is unselected.
- Drag the fuzziness slider left or right to refine your selection. Reducing the fuzziness will bring more of your original image back, while increasing it will remove more of the dust and pollen. I have never gotten the mask perfect in this stage, so don’t spend too much time with this step.
- Tip: At the bottom of the dialog there is a “Selection Preview” dropdown. This will allow you to preview your selection on the image itself in a few different ways.
- Click OK to accept your selection and close Color Range dialog.
- A moving dotted border (sometimes called “marching ants”) will indicate your new selection around the area defined by Color Range.
Save selection to Channel
Now that you have your selection, you want to store that information in a Channel, which will remember it and allows you to refine it more:
- Go to the menu bar and choose Select > Save Selection.
- When the Save Selection dialog box comes up, choose a name for your channel in the Name field. Click OK
- In the Channels Pallet (Window > Channels) you will see your selection is now a separate channel with the name you chose.
- To deactivate your selection, in the menu choose Select > Deselect.
- Click on the title of your channel to display it. You’ll see a black and white representation of your selection. Channels have the same principal as a mask — white areas are selected (or visible), black areas are not. (Fig B.)
Clean Mask with Dust and Scratches Filter
When you zoom to 100%, you’ll notice that not only has Color Range selected all of the foreground, it has also selected much of the debris as well. Our specks are black (Fig B., left), which means they are not selected, which means they will not be effected by our Adjustment Layer, which is not what we want. This can be easily fixed with a pass of the Dust and Scratches filter.
- In the menu bar select Filter > Noise > Dust & Scratches. I tend to use approximately Radius = 7, Threshold =7 for the settings on this, but encourage you to experiment on each image.
- Click OK to accept when you feel you’ve reach a nice balance of removing extras without modifying the major areas too much.

Refine Mask with Paint Brush
Your mask will be much cleaner now, but likely still not perfect (Fig B, right). I always have to go in and do some manual work on the mask. In the last stage I use the Paint Brush tool to correct the mask — filling in areas that didn’t get all the way included with black, and removing larger debris that didn’t get picked up by the Dust and Scratches filter with white. If you’re working on areas where there is a contrasting line between foreground and background, it’s ideal to use a softer edge brush, which makes for a smoother transition.
Tips for painting a mask:
- Use keyboard shortcut “b” to select the paint brush tool
- Keyboard shortcut “d” sets your foreground and background color swatches to their defaults (black foreground and white background).
- “x” switches your active swatch between foreground and background, making it easy to transition between black and white. I generally keep my non-mouse hand on “x” so I can just flip back and forth as I paint.
- Use the square brackets (“[“ or “]” ) to decrease and increase your brush size respectively. Holding shift for the curly brackets (“{“ and “}”) will adjust the feather of your brush edge.
- If you prefer a Quick Mask style of visual, turn on the visibility of the “RGB” channel as well as your Channel. This will show your selection as a red overlay on top of your image. What displays in red will not be part of the selection; what displays without the red color cast will. I tend to switch in and out of this mode.

Reload Your Selection
Once you are satisfied with your adjustments, your Channel is complete, and you’re ready to make a mask from it.
- Select > Load Selection
- Choose your Channel from the dropdown (if it isn’t already). Then click OK. This will reselect from your new corrections made to the mask.
Darken with Masked Levels Adjustment
- In the menu click Layer > Adjustment Layer > New Adjustment Layer > Levels.
- Because your selection was active when you created the Adjustment Layer, a mask is automatically generated from it. You can see a thumbnail preview in the layer’s palette (Fig. D).
- The Levels Adjustment has 3 main sliders that control your Black Point, White Point, and Midtone Point. The Black Point slider is on the left hand side, the further it is dragged it to the right, the darker the adjustment will become.

Figure D - Drag the black point slider all the way to the right (Fig. E).
- Congratulations if you’ve made it this far you should have a great start to cleaning the dust and pollen from your image! When zoomed in to 100%, if you turn on and off the visibility of the Adjustment Layer, you should see (nearly) all of the background debris appear and disappear.
- Further corrections can be made by clicking on the adjustment layer’s thumbnail (Fig D) and painting with black and white.
- Toggling the backslash “\” key will give you a preview of your mask in red.

Generally speaking an adjustment this extreme with levels would not be advised. You are literally crushing every pixel in your file to 100% black. In fact, for most of the adjustments I make in Photoshop, I’ve found that minor ones can be the most effective. In this particular case though, enough of our data is already black, so that it is not an issue.
Note: Although this tutorial was written for CS6, the techniques used are available in pretty much every relevant version of Photoshop. If you run into trouble, search Google for “Masked Adjustment Layers” or “Targeted Adjustment Layers” followed by your Photoshop version. You should find tutorials specific to your version.
This is a terrific tutorial. Thanks, Zac.
Love it and I have applied several concepts to my work.